
I love answering reader questions about colored pencils and creating colored pencil artwork. One reader wanted to know how I start a new drawing. It’s a good question, so it’s the topic for today’s post.
How I Start a New Drawing
How I start new drawings depends on the subject I’m drawing.
You see, I was portrait artist for forty years or more. Portraits require precision. The animal I’m drawing has to look like the client’s animal. It can’t be generic.
Landscapes, on the other hand, don’t require that kind of precision. So unless a landscape is fairly complex, I start it differently than I begin a portrait.
So let me describe each process.
One note…I’m going to be describing the initial phase of each process; the line drawing phase. That’s because that’s where my drawings always begin.
Color layering begins the same pretty much no matter what subject I’m drawing.
How I Start an Animal Drawing
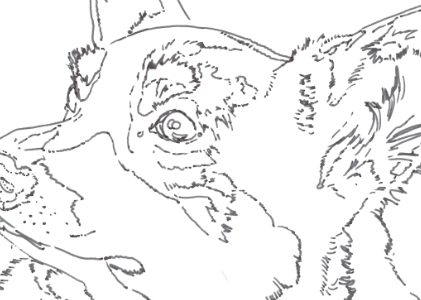
Whether or not the animal drawing is a client portrait, for a tutorial or for myself, I begin the process with a very detailed line drawing. There’s just no way around this for me. The animal I draw must look like the animal I’m drawing. Since colored pencil can be difficult to correct, it’s important to get the proportions and shapes right before I ever put colored pencil to drawing paper.
Depending on the time I have to finish the drawing, I do the line drawing one of two ways.
Tracing
If I’m on a short deadline for a portrait or exhibit piece, I start the new drawing by making a tracing of the reference photo.
But tracing a reference photo comes with it’s own risks because all photos have some photographic distortion. So I choose a photo with as few distortions as possible. This is the reference photo from the Faithful Lucy Tutorial after I’ve prepared the photo.

Once the photo is the way I want it for the portrait, I trace the photo onto clear Mylar film. That allows me to view the line drawing from the back as well as the front, and that helps me spot any errors in the drawing.
Flipping the digital reference photo horizontally and comparing it to the reversed drawing is also helpful in this as long as I’m careful not to re-enforce any distortions!
The finished line drawing looks like this.

By Hand
If time is not a concern, I much prefer to work out the details step-by-step, beginning with a grid on the reference photo. I use a photo editor (Affinity) for this and use a color that shows up well for the lines.

Then I print the photo with the grid and print the grid without the photo. The printed grid without the photo is what I begin drawing on.
The first step is blocking in the basic shapes, as shown below. I follow the grid closely at this stage, and then go over the drawing as many times as necessary to get a good likeness.

After I’ve done everything I can do on the grid, I trace the drawing to tracing paper, then begin another round of refinements. I like using tracing paper this way because I can refine the drawing on the front and on the back. Working in reverse allows me to spot any inaccuracies that aren’t easily visible when the drawing is viewed from the front.
Here is the finished drawing on tracing paper, ready to be transferred to paper.

How I Start a Landscape Drawing
When I begin a landscape drawing, I don’t take the time to work out a detailed line drawing. There are two main reasons for that.
The First Reason
Landscapes are so full of detail that I could spend weeks working out a detailed line drawing. Even when I leave things out of the reference photo (which I always do), there’s a lot to draw. Sometimes, there’s so much to draw that I lose heart before I finish the line drawing.
Since there are trees in almost all my landscapes, and since trees are so detailed, creating a detailed line drawing is usually counterproductive. Even if I were to spend weeks (months!) working out a detailed line drawing of a tree, I’d get so lost in the details that transferring it to drawing paper would be a monumental task.
Starting color work would be an even more confusing and overwhelming task.
The Second Reason
Even with a fairly detailed line drawing to start, I usually don’t end up following that line drawing exactly as I layer color. That’s because I found my landscapes take on a life of their own as I draw.
Trees “grow” and sometimes move around. Clouds reshape themselves. Even hills and meadows change in some way.
Since I know by experience that this happens, why bother with a detailed line drawing?
How I Start a New Landscape Drawing
What I do instead is mark off the picture in thirds, place the major elements where I want them, and then add the rest. I use colored pencil for this, but I use a color that fits into the landscape.
In this sample, I used darker colors than usual so the image would show up here. I usually use light pressure for both the grid lines and the sketch.

The thing that’s most important to the drawing is placed on or near one of the intersections. For this demo, that’s the big tree.
If there are man-made items such as buildings or a fence, I may do a separate drawing for them, but only because they have to look at least a little bit like what they’re supposed to look like. (And because I’m not a good technical artist!)
I wrote a post about the rule of thirds, which simplifies the process for those who are not familiar with it.
The Bottom Line
Those are the basics of starting a drawing. Almost every drawing I do goes through one of these processes.
One warning: These methods are how I start a new drawing. That doesn’t automatically mean they’re the right way to start new artwork; only that they’re right for me.
If they work for you, too, great!
But if they don’t, please don’t feel discouraged. There is a method that works for you. That’s the method you should use! Remember, there is no “right way” to start a drawing.
So what works for you?
Sign up for Carrie’s free weekly newsletter and be among the first to know when she publishes new articles.


I really enjoyed the tutorial using Lucy. She is now adorning the wall at a local veterinary.
I am also so glad I read your post re paper holes before I was going to use OMS. I am never happy with the result when I have tried to use it. When I get bored or stuck on what to do next with a drawing I turn to my other passion of knitting.
Thank you for all posts and advice. It keeps me inspired
Janet,
Thank you for taking the time to leave a comment.
I’m glad you enjoyed drawing Lucy. That’s one of my favorite dog portraits. She has such an adorable face and has had such a difficult life.
Having another creative outlet to turn to is a great way to take a break from art and still be creative. I’ve sometimes thought about learning to knit or crochet, but have never taken the time to do more than think about it. I learned the basics of crocheting as a child way back when.