There are a lot of different types of paper on the market today. Some are smooth, some are rough, and some are in between. Despite the popularity of textured papers among many artists, a lot of artists still prefer smooth papers. So today I’d like to share a few tips for drawing on smooth paper.
Before I go any further, let me say that I used to be a big fan of smooth papers. I loved papers like Rising Stonehenge, Bristol Vellum, and many of the Strathmore artist papers. Generally, the smoother a paper, the better I liked it.
So I have a lot of experience using smooth papers. The following tips are based on that experience, but they are written for artists new to colored pencils. With that in mind, let’s talk a little bit about smooth papers first.
A Little Bit about Smooth Papers
Smooth papers generally have only a little tooth. Some of them have a velvety texture. Some, like drafting film, have very little tooth at all.
For this post, I’m talking mostly about Stonehenge, Bristol, and similar papers. Drafting film is altogether different than most other artists papers. So is a paper called Yupo. They are so different, in fact, that they deserve their own post.
Popular smooth papers are Rising Stonehenge, and the Strathmore 400 series. Stonehenge has a velvety texture to the touch, but it can take a lot of layers.
Bristol is very smooth. It’s great for detail. But unless you use feather-light pressure, you are limited on the number of layers you can add.
NOTE:
Not all Bristol papers are the same. I once led a class in which the project was a horse on Bristol. Students attended from all over the world and used whatever Bristol they could get. Some of the Bristol had a very pleasing visible texture that I’d never seen before. So for this discussion, I’m talking about Bristol papers such as Bienfang, which is very smooth.
What Smooth Papers are Good For
Smooth papers are ideal for fine detail.
It’s also easy to apply color to smooth papers.
If you like to create colored pencil drawings that have no paper showing through the finished drawing, smooth papers will probably help you the most.
They’re also perfect for artists who are new to colored pencils. Newbies can learn about layering, blending, and combining colors on smooth papers without also worrying about filling in a lot of surface texture. The best part is that those skills also work on textured papers if you want to try them later.
Most come in pads or sheets, and are easy to find in most art supply stores or online. If you like buying paper in pads, make sure to compare it to the full sheet versions of the same type of paper. There are sometimes small differences.
My favorite smooth papers are Stonehenge and Strathmore Artagain. I also use Beinfang Bristol Vellum. One of the things I like about Stonehenge is the deckle edge on full sheets (shown below). That adds a bit of class to finished drawings, in my opinion; even if you can’t see it after framing.

Tips for Working on Smooth Paper
Tip #1: Sharp Pencils
Sharp pencils are probably the most important tip for drawing on smooth paper that I can give you. That’s because the key to drawing smooth color on any paper is getting color down into the tooth of the paper. Sharp pencils make that easier.
But it’s especially important with smooth papers because it’s very easy to fill the tooth so much that you can’t add more color. With sharp pencils, you can get color down into the paper’s texture without adding so much color you clog the texture.

Tip #2: Light Pressure
Light pressure is the next most important tip.
You see, the smoother the paper, the fewer layers of color you can add. If you want to mix colors and do more layers, light pressure is a must.
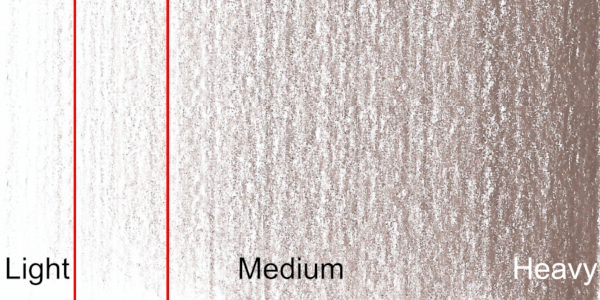
This pressure scale comes from some of my tutorials, and I use it to demonstrate how different pressures look on paper. I used the same strokes, but increased the pressure as I worked toward the right. Typically, the pressure I use most of the time is in the area marked with red lines.
Tip #3: Lots of Layers
So how to you develop strong color and good values if you use light pressure? Lot’s of layers!
When you use light pressure on smooth paper, you can add more layers. That means you can layer two colors to get a third color. It also means you can slightly adjust the color of an area by lightly layering another color over it.
But on smooth paper, all those layers must be applied with light pressure and sharp pencils.
I could have drawn the same gradated color above by using light pressure for the whole thing, but adding more layers.
The bonus is that the resulting color would also have been smoother. Those paper holes you see in the pressure chart above would have been mostly filled in.
Tip #4: Use Solvents Sparingly
Most smooth papers don’t handle moisture well. Stonehenge will stand up under some solvent blending but only if you tape it to a rigid support first.
But papers like Bristol don’t hold up well with even small amount of solvent blending. The less color you have on the paper, the more likely it will buckle or warp if you use solvent.
If you plan to use solvent, test it on a small piece of the paper you want to use first.
The best option, of course, is to avoid solvent.
Tip #5: Save Burnishing for Last
Burnishing is a method of blending that uses heavy pressure to blend colors. You can read more about it here. You can use colored pencils for burnishing, or special pencils like these colorless blenders from Prismacolor.

Burnishing is a good way to blend color, but it leaves a lot of wax on the paper because you’re using such heavy pressure.
Burnishing also presses down the tooth of the paper, and can make the surface very slick.
That means that it may be very difficult to add more color over an area that’s been burnished. That’s why it’s so important to leave burnishing until the drawing is nearly finished.
Do you have to burnish? No. The fact is that I prefer not to burnish at all. Instead, I fill the tooth of the paper with multiple layers of color. I like the results better and I can generally add more layers than would be possible if I burnished.
Those are My Top 5 Tips for Working on Smooth Paper
They’re not the only suggestions I could make, but they are the five most important.
The best part is that you don’t need special tools, unless you want to use solvents or colorless blenders. You may need to practice, especially using light pressure. But you can master these tips.
Once you do, they will make a difference in the results you get when working on smooth paper.
Sign up for Carrie’s free weekly newsletter and be among the first to know when she publishes new articles.