
A dark background to makes your subject stand out like no other background. Especially a brightly lighted one. But what’s the best way to draw a dark background?
There are several ways to get a dark or black background for your colored pencil drawings. Colored paper, mixed media, and using colored pencil.
Colored paper—and especially dark paper—presents a set of drawing problems better left for another post.
Mixed media with India ink, acrylics, or air brushing are also topics for other posts.

That leaves drawing a dark background with colored pencil; a process that can be time consuming. But it doesn’t have to be, and I’ll show you one way to draw very dark backgrounds quickly.
How to Draw a Dark Background with Colored Pencil
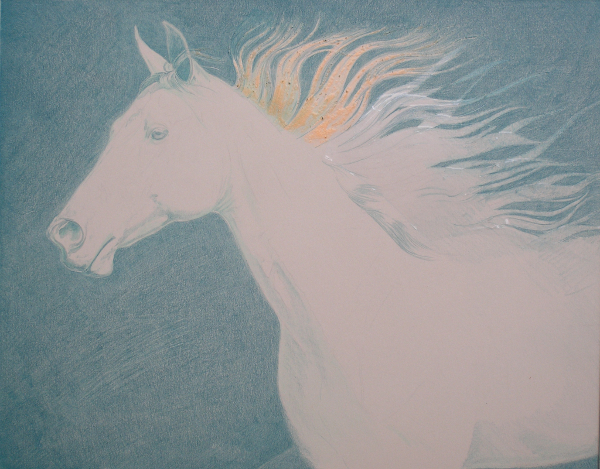
I had in mind a head study of a running horse, but my model was filled with light. She also had a long, black mane.
It might seem counter intuitive, but I planned do a dark background layer by layer. The plan was to use light pressure to layer several different colors to develop a rich black. The process began with Prismacolor Peacock Green and I spent several hours working on it.
As much as I looked forward to drawing the mane, drawing the background around the mane was a problem. This is as far as I got layering color with light pressure.

A Change in Course
Before I got any further, it was time to work on the next article for EmptyEasel. I chose to write about using masking fluid with colored pencil. That article needed a demonstration piece.
This drawing waited on the easel. I looked at all that mane, and decided the horse—more specifically her mane—was the perfect subject for the article.
And so it was.
I used both masking fluid and masking film on the mane, working on both at the same time to compare them. The part of the mane that is orange is masking fluid. The rest is masking film.
Drawing the Dark Background
First, I applied Dark Brown over all of the background using medium pressure (normal handwriting pressure). I added between two and five layers over the entire background, but wasn’t satisfied with the result.

Next, I chose three colors–Indigo Blue, Dark Brown, and Black–and applied them with medium-heavy to heavy pressure.
Working from one area to the next beginning at the upper right, I layered Indigo Blue and Dark Brown in random patterns. I then added Black. I used medium-heavy pressure for all three colors.
When I’d covered all of the background, I burnished it with each color. For most of the background, I burnished with all three colors, usually finishing with black. But I also burnished some areas with only Indigo Blue or Dark Brown, depending on whether I wanted cool tones or warm tones.
Finally, I burnished with Burnt Ochre to accent the head and to introduce the primary color of the horse into the background.
It took two days to finish the background with heavier layers of color. Although I don’t usually prefer this more direct method of drawing, it is a satisfactory look.

Conclusion
Ironically, this drawing never went any further. It lurks somewhere in the studio, waiting for resuscitation, but even if it remains unfinished, it served its purpose.
I know one more way to draw a dark background.
And now you do, too!
If you have a drawing you need to be finish quickly and you want deep colors and saturation, this method may very well be your solution.


I did not know this procedure way back and had to have a black background really black. So my solution was grab a 9B graphite and off it went. Result perfect black in no time at all.
Joe,
Thanks for the comment.
Graphite can be used, though it doesn’t usually play very well with colored pencil. It makes colors muddy or gray if you get it into the colored pencil areas, and colored pencil won’t stick to it very well, if the graphite has been applied with such heavy pressure that it’s shiny.
How did your project turn out?
I learned at my own expense that colored pencils do not take too well on graphite but I used it only as a background. It is shiny yeah. But I didn’t know any better and the background was quite large.
Hello,
I admit I am not patient enough to tackle a large dark background using solely colored pencil. I would resort to some other method such as dark paper or watercolor. I did however on a Roadrunner portrait create some very dark enriched blacks by blending black, indigo and I think brown. I used OMS to blend. It only took about 3 or 4 layers as I recall. Very nice effect. I used Polychromos.
I am interested in your comment, “I know one more way to create a dark background”. What is that?
Stephanie,
Indigo Blue and Dark Brown make a nice dark color on their own, so adding Black is a good way to get a very dark background.
Blending with solvent certainly speeds up the process, and I have used it upon occasion, as well.
Thank you for the comments!
Carrie
The only time I had success with any kind of background color I used shavings from my colored pencils and did a rubbing with them before I started coloring my picture. It did work but I don’t know how dark I could have gotten it. Thank you for so many other ideas.
Backgrounds definitely take practice and experimentation, Virginia. That’s why I let the color of the paper be the background for so many years.
Your method of rubbing shavings onto paper sound intriguing. I’ll have to give that a try.
I do quite a lot of aviation art using colored pencils. My question is do I color in pencil/ink for the background initially, or should I draw my aircraft (normally very detailed) first and then attempt to create a background around it? The second attempt seems to create greater risk of destroying the aircraft drawing, while the first attempt of first creating the background(especially if my background in dark) will I be able to draw my subject with the detail I wish to put into it. Your suggestions are appreciated.
Ken,
There isn’t really a Right Answer to this question. A lot depends on how you do each part.
In general, if you mix water-based media with colored pencils, you have to do the water-based media first. Colored pencil sticks well to water-based media, but water-based media doesn’t stick well to colored pencils.
I can’t even say that I always do the background first with colored pencils. The reason is that it’s difficult to add details over a background. Sometimes, it’s just better to do the subject first and then the background. But I do a lot of landscape and animal art, in which there are small details overlapping the background.
With more technical art, like you do, it may be easier to do the background first, then draw the aircraft, since most aircraft have hard edges.
I’d need to see some of your work and know more about how you draw before I could make more specific recommendations.
Thank you for your comment, though!
From Cynthia Knox I learned that three layers of dark colors like Indigo blue, Tuscan Red and regular black go well if you burnish afterwards with a Stabilo black pencil at the end. This gives wonderful, rich black backgrounds.
Cecile Baird uses a similar process. I don’t know which colors she uses, but any combination of dark colors combined with black are good. I’ve never tried Tuscan Red because it’s not as lightfast as I like, but it can be useful.
I know these are old articles, but thank you so much for this post and the post on using masking fluid on Empty Easel!!! I am a new colored pencil artist (and generally pretty green as far as fine art technique is concerned), and despite a lot of research, I was really struggling to find an answer as to how to handle the background for a subject with a lot of light-colored wispy edges, like your horse mane. Masking fluid may indeed be the answer.
As for dark backgrounds, thanks for sharing this technique. I recently did a mostly very dark background with cold dark grays and black, and I was ultimately very pleased with how it came out. (Surely it wasn’t as rich as your use of colors to make a dark background, but I was going for something “cold.”) I blended with OMS, and made use of blending stumps and cotton swabs before the OMS evaporated completely, and that worked well. I also followed up with an additional layer (or two?) of pencil to overcome any blotchiness, which seemed to blend particularly well after the previous OMS application and blending. It still took a while, but perhaps not more than your technique did.
Leah,
Thank you for reading this post and the other one, and for taking the time to leave a comment.
I’m glad these articles were helpful to you, and have helped you develop your skills with colored pencils.
You are right about thinking that cold grays and black would make a good dark background with a cold feel. That’s a good call on your part. Given my experience with masking fluid and masking film, I would say your method was probably a little bit faster. It takes time and effort to apply masking fluid and even more to cut out the shapes with masking film. I found that the process works, but is very time consuming.
So good for you in finding a way that works for you.
And thank you for sharing it with me and other readers.
Best wishes!
Ah, but my drawing with the light wispy edges will still require something like your masking fluid technique- it is not solved by how I did the cold dark background in a different drawing. Thanks again for sharing the masking fluid technique on Empty Easel.