
I recently received an email from an artist who was frustrated over filling in paper holes on Canson Mi-Teintes paper. She just couldn’t do it on small pieces.
The size of work was an ACEO, 3-1/2 inches by 2-1/2 inches. That is pretty small, and she was reluctant to try solvent blending on such a small piece.
She’d also tried blending color with a paper stump, but had no success with that method, either.
So I’m going to try to answer her question here, and hopefully help out everyone else who has had similar problems.
Because the reader’s question had specifically to do with Canson Mi-Teintes and Faber-Castell Polychromos pencils, that’s the combination I’ll use.
Filling in Paper Holes on Canson Mi-Teintes
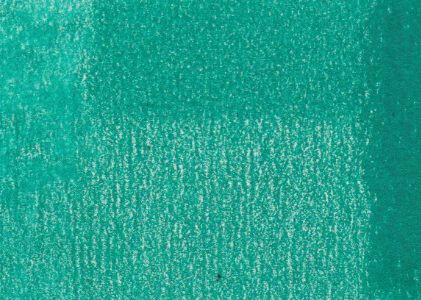
Canson Mi-Teintes takes a lot of layers, especially if you’re working on the front. If you see a honeycomb pattern in your color, that’s the front. I usually use the back of the paper because it’s a little smoother.
I used the same stroking patterns (hatching and crosshatching) and about the same number of layers (16 to 24) on each sample below. The difference is the difference between the front of the paper and the back.

The back of Canson Mi-Teintes is clearly much smoother than the front, so if you’re using this paper and having trouble filling in the paper holes, my first tip is to make sure you’re using the back. If a honeycomb pattern appears as you draw, you’re using the front. Turn the paper over and start again!
Even so, the back still has visible texture, as the illustration above shows. So how do you fill the paper holes?
Hatching and Crosshatching
As I mentioned above, I created the first samples by first hatching color, then by crosshatching subsequent layers. What does that mean?
It means that all color was applied with straight parallel strokes. The first layer was applied vertically. I placed strokes very close together and worked my way across the sample.
The next layer was applied horizontally, and then I applied two opposing diagonal layers. Keep in mind that I covered the sample with 3 or more layers with each set of strokes, and that I used light pressure.
In this sample, the vertical hatching layer is finished. I made about three passes over all of the sample, and added additional color in some areas to smooth out the color. The top half shows the result of simple layering.

Dry Blending
After I finished applying color above, I got the bright idea to blend with paper towel, just to see what happened. The bottom half shows the result. The color appears to have changed, but it hasn’t really. That’s the result of pressing pigment down into the tooth of the Canson Mi-Teintes. It’s also the result of the paper towel picking up some color.
I chose paper towel rather than facial tissue (non-lotion) or bathroom tissue, because it has more texture. It just seemed like a good match for Canson Mi-Teintes. The other options would probably work, too.
More Layering
From left to right, the first section is hatching, the second is crosshatching with a horizontal stroke. The third and fourth sections are crosshatching on the diagonal, but one is from upper right to lower left. The other is upper left to lower right.

In the darkest box, I went back to the vertical stroke, but applied it with heavier pressure. I didn’t burnish it.
As you can see, each round of layering filled in more of the paper holes.
Working with the Grain
After I completed the previous sample, it was easy to see that the paper had a specific tooth or grain. The pattern was vertical, so I made a new sample and filled it in with hatching strokes. Since the sample texture is vertical, all my strokes were vertical.
I did about the same number of layers as before, using the lightest pressure possible. I had to increase pressure toward the end, but was still using medium pressure or lighter.
However, I kept my pencil sharp so it got down into the tooth a little better, and I held my pencil vertically. That was a bit of a challenge, since that’s not a normal way to hold a pencil. But the combination of a sharp point and vertical hold allowed me to fill in more of the tooth this way than by hatching and crosshatching.
By the way, I didn’t dry blend this sample. It’s all layering.

Solvent & Burnishing
To fill more of the paper holes, I next used solvent on the left end. I blended with a cotton swab and tapped the swab on the paper. I thought that might be better than brushing because I didn’t want to color to migrate, as brushing might do.
As you can see, there was still some color migration. Some areas are lighter where color was lifted, and some are darker, where extra color was left behind. It’s not a smooth blend, but it will allow additional layers once the paper is dry.
If you use solvent, use it sparingly. No more than I used, it soaked through to the back of the paper, but it dried without staining or warping the paper.

On the right end, I burnished with the same pencil I used to layer color. I had to go over the area several times with heavy pressure to get this amount of coverage. The holes are nearly all filled in, but the paper surface is so clogged with color that the lightest brush across the surface of the paper pulls color into adjacent areas.
It will also be next to impossible to add more color without using workable fixative.
I didn’t do anything with the center section.
Stippling
Stippling is tapping the paper with the tip of the pencil. Hold the pencil as close to vertical as you can and use a very sharp pencil.
In this sample, I stippled several layers over the top half of the middle section. I kept my pencil sharp and held it in as vertical position as possible. As I mentioned above, that is a challenge because I inevitably let my hand relax. That changes the position of the pencil relative to the paper, and makes stippling less effective.
But you can easily see how much more of the paper holes are filled in by stippling.

Filling in Paper Holes on Canson Mi-Teintes
One thing I didn’t try was starting with a base layer of water-based media. I didn’t think of that until much later, but it could be a good option. If you try this, tape the paper to a rigid support, and test the water-based media first. The Canson Mi-Teintes I used for these demos didn’t buckle with the solvent, but I don’t know how it would respond to water.
Chances are that you’ll get the best results by mixing some of the methods I described above. That’s what happened to me. What gave me the best results? In looking at my samples in person, it’s easy to see that starting with hatching strokes following the grain of the paper worked best when followed by stippling.
Will that work for you? Possibly.
At any rate, try these ideas separately, then mix and match them and see what you come up with!
Got a question? Ask Carrie!
Sign up for Carrie’s free weekly newsletter and be among the first to know when she publishes new articles.


