
Today’s post continues a series of posts describing various strokes and how you can use them for maximum effect. Today, I’m talking about directional strokes with colored pencils.
Previous posts in this series include discussions of stippling and hatching.
Now let’s get started.
Directional Strokes
Directional strokes are strokes that you use to indicate textures such as hair or grass. They vary in length from very short to very long. They can also be curly, curvy or fairly straight.
They’re called “directional” because they follow the direction of whatever texture you’re drawing.
These are directional strokes mimicking grass. As you can see, no two of them are the same. They are all different lengths, they curve in different directions and to different degrees. That’s what makes them so effective in drawing textures like hair and grass.

Contour Strokes
Contour strokes are similar to directional strokes, and that’s why I’m including them here.
The main difference is that contour strokes are applied around the surface contour of whatever you’re drawing. For example, if you’re drawing a ball and using contour strokes, the strokes should be curved and follow the shape of the ball. They indicate shape more than texture, but they are still a variation on directional strokes.
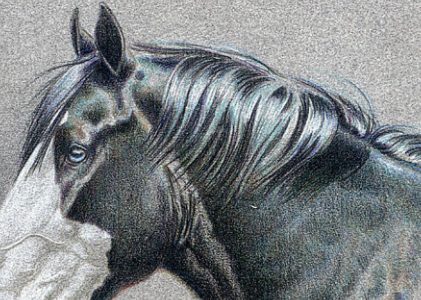
In this illustration, the white to the upper left of the eye has been applied with contour strokes. These strokes follow the contours of the skull in that area. They help shape the horse’s head.

For comparison, the strokes in the forelock are directional strokes. I used them for the same reason I used contour strokes: To give shape and form to that area.
How to Use Directional Strokes
Using directional and contour strokes is simple. Put your pencil on the paper and stroke in the direction you want to go. With directional strokes, you can stroke quickly and still get good results. In fact, if you’re drawing something like grass, where there’s a lot variety, going more quickly can be to your advantage.
If you’re doing contour strokes and following the surface shape of something, be a little more deliberate in how you stroke. You want the strokes to be more precise and uniform to accurately create the shapes.
For both, you can use sharp or dull pencils. Sharp pencils make thinner, more precise marks, while dull or blunt pencils make thicker marks. Thick marks may also have softer edges.
When using directional or contour strokes in the early layers, use light pressure. As you build up layers of color, you may need to increase pressure. My practice is to increase pressure only when needed and only as much as needed to make marks. I like to use light pressure as long as possible, but your drawing method may require something different.
Keeping Strokes From Becoming Too Bold
If all you do is directional or contour strokes in an area, the strokes may start to look too bold. When this happens, apply a blending layer of a light, neutral color that fits the colors you’ve already used. Use light pressure and a scumbling (circular) stroke for this.
To keep strokes from getting too bold, add a layer of color applied with light pressure and scumbling or hatching strokes now and again.
By the way, the colors I most often use for these blending and softening layers are Polychromos Warm Grey I for warm colors and Cold Grey I for cool colors. If I’m using Prismacolor or some other brand, I use the lightest warm or cool grays.
But you can also use a light earth tone if you have a color you like and that’s not too dark in value.
When I Use Directional Strokes with Colored Pencils
As you might guess from comments I made at the beginning of this post, I use directional strokes most often when I’m drawing hair and grass. They’re perfect for both applications.
Horses
Since I spent years as a horse portrait artist and I still do horse portraits, directional strokes are the perfect strokes. Take this portrait, for example.
It’s pretty clear that I used directional strokes in the mane and forelock. Some of the strokes are long and smooth (forelock and upper mane.) But I also mixed in directional strokes with more movement in the mane at the shoulder. The wind was moving the longer hair in that area, so I matched the shape and direction of my strokes to that movement.

I also used short directional strokes in the darker values on the shoulder. These are mixed with hatching strokes to create smooth color.
But that isn’t the only time I use them.
Landscapes
In the artwork below, I also used directional strokes and contour strokes.
The clouds are storm clouds with a lot of mass, so I started the layering process with contour strokes to map out the shapes. I continued to use contour strokes throughout the layering process and as needed to reinforce the shapes.
The strokes aren’t as obvious as in the horse portrait above because I alternated contour strokes with scumbling and hatching strokes. That’s because the clouds needed to be smooth color, and using different kinds of strokes is a great way to get smooth color.
But contour strokes are the foundation.

In the grasses, I used directional strokes of all sizes and shapes. For this area, I started out with a base layer of color applied with the sides of the pencils in sweeping horizontal strokes. That’s because I wanted smooth color beneath the directional strokes.
But for the remaining layers, I used a mix of directional strokes of differing lengths to create the look of grass. I also mixed colors for a more natural look, but applied all the colors with directional strokes.
Making the Most of Directional Strokes with Colored Pencils
Each of these strokes is a unique tool in my colored pencil tool box. Not all of them can be used all the time, but there is a place in most drawings for all of them.
You may find them useful, too.
No matter what strokes you prefer, add the directional and contour strokes to your tool box for those special textures.
Want to read more posts like this? Sign up for Carrie’s free weekly newsletter and be among the first to know when she publishes new articles.


